| | | | |
 |
|
Earthquakes IntroductionIzmit earthquakeFloods Thessaloniki (Greece)Hurricanes Storm surgesHurricane KatrinaVolcanoes IntroductionAndean Volcanic BeltEtnaNyiragongo and Nyamuragira
| | | | | | | Exercise 1: Exploring and learning about the volcano
Click on File > Open. Select the file named Ny_landsat_2001.tif. The file contains different bands. Click on greyscale and select band 1. A window appears showing the image preview. Click on > OK. Repeat the same process for all bands. You can also see the option to Crop (cut) images.
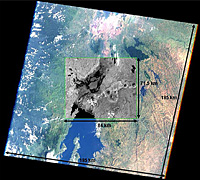
| | | Landsat 7 image taken on 31 January 2003 |
All the images were previously orthorectified and projected in UTM by USGS, but they still had to be coregistered, and the layers had to be stacked. All images of this exercise were cropped to an extent of 84 km x 71.5 km (former 185 x 185 km). This was done in order to reduce the data volume and to cover the two volcanoes and the area around them, including the other volcanoes situated in the Virunga National Park.
For comparison, look at the file ny_landsat_overview.jpg. You can see that the volcano is a very large natural phenomenon. This is one reason why satellite data is used for the monitoring of volcanoes, as it covers large areas and can therefore monitor large scale phenomena which cannot be observed as a whole from Earth.
Explore the image
Look at the different bands and try to zoom in. Look closely at features related to volcanic activity.
1. Why do you think they all look much darker than in the preview and have a low contrast? (We will explore this further later on.)
2. Which volcanic features can you detect? Can you find old lava flows, hot lava, craters, cones, and a volcanic plume in the image?
3. Can you find any clearly visible differences between the bands? Pick an area (of what you believe is e.g. vegetation, lava…) and look at the grey values (from black to white) in different bands.
Consider the principles of remote sensing on the Eduspace website and the Landsat bands (worksheet introduction).
The next paragraphs refer to the LEOWorks Tutorial, page 16 - 20.
Click on the Image Information icon and look at: the image size (width and height in pixels = image coordinates), pixel size in metres, and projection.
4. Do all bands have the same extension and pixel size?
| |
| | Nyiragongo and Nyamuragira IntroductionChange detection and hazard assessment Worksheet introductionExercise 2: Lava Detection using Supervised ClassificationExercise 3: Multitemporal Change Detection and MonitoringEduspace - Download Nyiragongo_Landsat.zipEduspace - Software LEOWorks 3LEOWorks 3 Tutorial
|